
It’s time to record some videos! Irrespective of whether one utilizes a Macintosh, an Apple television set, or iOS contrivances, this manuscript shall delineate the methodology of capturing one’s computer display. What is Apple TV?
Record the screen of your MacBook
To start recording what’s on your Macintosh’s screen, open QuickTime Player. Select “New Screen Recording” from the “File” menu. It will look like this when you open the Screen Recording window.
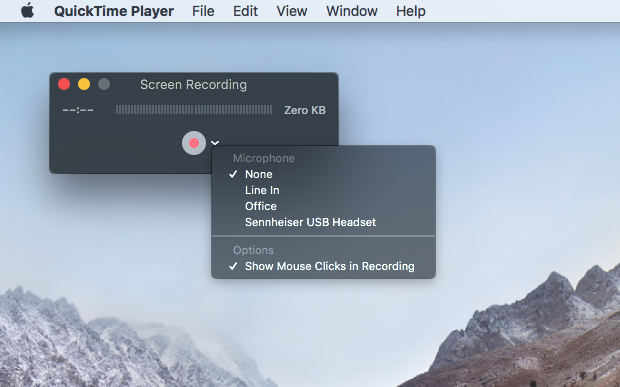
To see the configuration options, click the arrow that points downward next to the “Record” button. To add a voiceover, you need to choose a microphone source. If you want to see mouse clicks in the recorded video, turn this option on. Clicks will appear as a big black circle around the cursor.
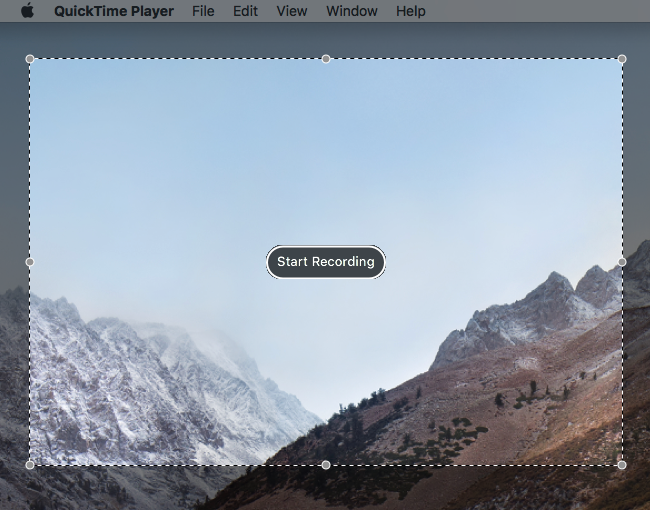
Next, press the big button that says “record.” After that, you can either start recording again by clicking or drag the cursor to mark a specific area to record. In the second case, click Start Recording to start when you’re happy with your choice.
When you’re done recording, go to the menu bar and click on the record button. After recording, your video will open in QuickTime Player so that you can do more work on it.
You can save, cut, and send your video.
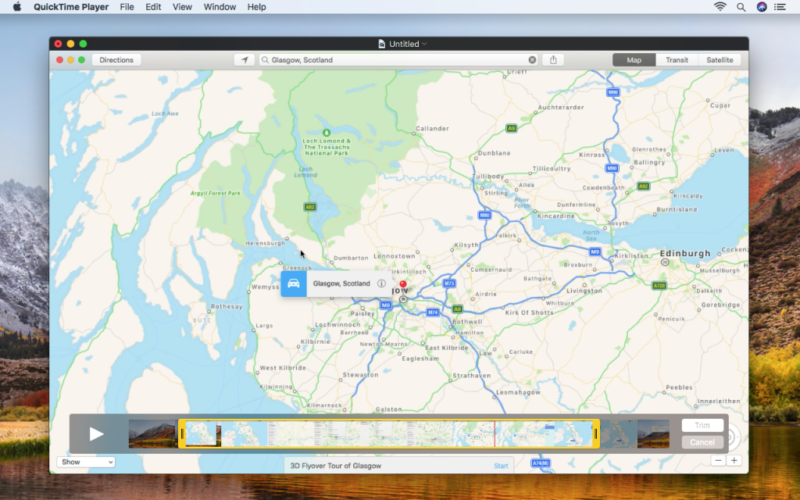
After you watch your movie again, you might need to make some changes. You can make a copy of the whole recording by going to the File menu and selecting “Save” before making any changes. Next, go to the Edit menu and press Command+T to select Trim. You can set new beginning and ending points for your video by dragging the yellow handles. If you want to make full-screen video captures, you might want to cut out the part where the cursor moves to the menu bar to stop recording.
For those who are sure they won’t need the cut footage, go to the File menu and press Command+S to replace the original file. If you’d rather, you could copy your clip by going to File > Duplicate and then saving the copy.
The file size may be big for long movies or movies taken from screens with a lot of detail. You can use Export As to save versions of your movie in formats with lower resolutions, which can be useful for sending videos by email. Should you decide to upload the video to YouTube, however, you should not lower the quality first. YouTube will do that for you. If you want to share the video through iCloud, follow the same steps.
You can record the screen of your Apple TV.
It’s not always easy to record video from an Apple TV. Before you do anything else, make sure that your Apple TV is sending content via HDMI to either a TV or a headless display emulator.
To record from an Apple TV, you need to connect it to your Mac as well. For the fourth-generation model, you’ll need to use a USB-C cable for this. But because the Apple TV 4K doesn’t have a USB-C port, you need to sync your Apple TV and Mac. You need to connect both devices to the same Wi-Fi network.
This synchronization can be done in different ways depending on the version of macOS you have. Use Xcode, which is free in the Mac App Store, if you’re using macOS Sierra. Start up Xcode to get to Window > Devices and Simulators of course. You can change the remotes and devices on your Apple TV 4K by going to System > Remotes and Devices in the Settings app. Choose your Apple TV in Xcode and enter the PIN that shows up on the Apple TV. It looks like this will connect the devices.
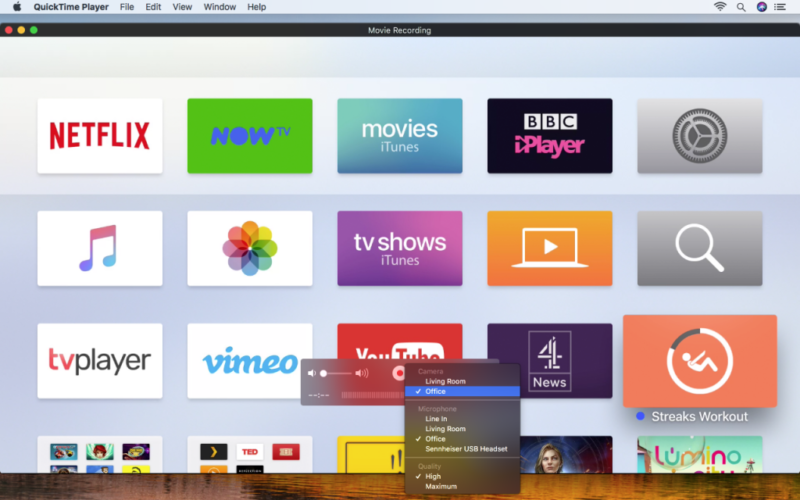
To start recording from your Apple TV with QuickTime Player, do the following:
- To get to the File menu, open QuickTime Player.
- Choose to record a new movie.
- Next to the record button, click the arrow that points down.
- Pick your Apple TV from the list of Camera and Microphone.
- If you want to change the quality, choose either high or maximum.
If you’re using macOS Sierra, your connected Apple TV should now show up in QuickTime Player, so you can start recording right away. But if you’re using macOS High Sierra, you’ll need to take an extra step. When you choose your Apple TV from the Camera options, your Mac will ask you to enter a code from your Apple TV. After that, allow the Apple TV to prompt you to record your screen.
Note: There will be a red box around the Apple TV’s screen while recording is going on, but this box does not become part of your recorded movie.
It’s important to note that QuickTime Player lets you choose a camera and microphone source even when you’re recording from your Mac’s built-in camera or any other connected video or microphone source.
You can record the screen of an iPhone or iPad.
iOS 11 makes it possible for iPhones and iPads to record their own screens without installing any extra software. Here are the steps you need to take to turn this feature on:
- Start up your device and go to the Settings app.
- Go to Control Center and select Customize Controls.
- Find the “Screen Recording” option and press the plus sign (+) next to it.
You can get to the Control Center by swiping up from the bottom of your screen. The screen recording button will be on the screen. Tap If you press this button, there will be a three-second countdown before the recording starts. concl To stop the recording, either tap the red bar at the top of the screen and choose “Stop” or press the Control Center button for screen recording again. ently that your video will be saved to your Photos app automatically.
As long as your iPhone or iPad is running iOS 10, connect them to your Mac via USB. Then do the same thing in QuickTime Player that we said you did to record from an Apple TV.
I’d like to hear your thoughts and comments about this article. Plea Please share your thoughts in the section below for comments so that we can improve the quality of our content. Thank you in advance for your contribution.